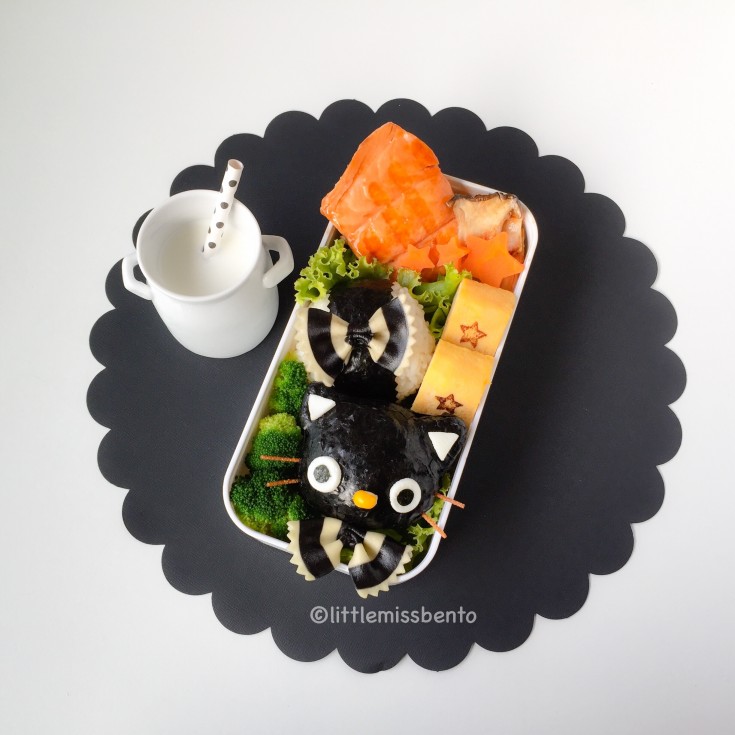
Black Cat Bento! So happy to make this Monochrome thematic black cat bento.
After seeing one of my IG friend posting about these super cute black and white farfelle pasta that were sold at Mustafa, I went down last week and bought a pack of the pasta.
Frankly, the quality of the pasta pales in comparison to the ones I buy in Japan. Not all the prints and shapes of the pasta were consistent, so I had to pick and choose the pretty farfelle pasta pieces for the bento.
To match the monochromatic colors, I wanted a black and white theme bento today. And decided to make a black cat bento.
Also pretty nice for the upcoming Halloween too ^ ^
The bento was packed in my white monbento from Bento&co. The side dishes included teriyaki salmon fillet, tamagoyaki (Japanese egg roll omelette), and vegetables.
To kick start the week, I also included a bento tutorial to make the black cat. Have fun~
Bento Tutorial – Black Cat Bento
Ingredients
- Rice
- Seaweed 1 sheet
- White egg sheet
- Deep fried pasta
- Corn kernel
- Farfelle pasta
Tools
- Cling wrap
- Scissors
- Round cutter
- Tweezer
- Toothpick
Method
1. Using cling wrap, shape the rice into an oval shape for the head and 2 triangles for the ears.
2. Wrap the rice ball with seaweed.
3. Using round cutter, cut 2 circles for the whites of the eyes from thin white egg sheet.
4. Using scissors, cut two triangles for the inner ears from thin white egg sheets.
5. Cut 2 circles for the eyes from seaweed.
6. Prepare 4 pieces of deep fried pasta sticks for the whiskers.
7. Prepare one corn kernel for the nose.
8. Assemble the features and details on the rice ball. To insert the pasta sticks, use a toothpick to create inserts before sticking in the pasta sticks.




October 8, 2014
Very cute! Thanks for sharing the tutorial! I am going to head to Mustafa one of these days to check out these striped pasta!
October 8, 2014
heheh yup! its pretty cool that we can get these cute black white pasta here :)
October 7, 2014
Very nicely done!! Tks for the tutorial!
October 8, 2014
Awwww thank you so much!
October 7, 2014
amazing!!!
how you did the stars on the tamagoyaki?
October 7, 2014
thank you so much Jane :) I made them using branding iron which is heated and press on top to cause a ‘burn’ print/mark. :) It is used in traditional japanese sweets but I like using them on tamagoyaki !heh
October 8, 2014
oh ho nice! do you know if i can find such branding iron in ebay maybe, or other online shops?
here do you buy them? :)
October 9, 2014
I bought most of mine at physical stores in Japan. have you shop on Rakuten Japan? You will need a forwarding service and be able to read some Japanese.